The hardest part of camping is finding decent internet on the road. Hey I grew up thinking 9600 bps was blazing fast dial up and yet I find most campground internet slow in comparison. This year we decided to get StarLink to address this most irritating problem. We opted for the RV version back in February 2023. After some fiddling with the connections it was up and running in no time. Test proved that it is for real!

the speed fluctuates a bit as we are in a congested area but still it hands down beats the speeds we saw at most areas while traveling.
After examining the 75 feet of cable and other hardware it became clear installing this thing in the van was going to be a challenge.
The Antenna is big and bulky. The antenna support tube is long and will only retract to about 30 degree angle when in Stowed position. Making it bulky and not shelf stackable. Which means we have to find a special place just for this beast.
The connectors are definitely not USB or any other standard that I have every worked with in the past. They are also big with weird angles that make fitting them through a standard water tight box impossible.
Here is how we attacked these problems;
1. Design a roof top mount to hold the antenna while the van is sitting still
The antenna will be stored in side the van while moving
2. Find a location with good visibility to install the router/modem box
3. Find a secure location inside the van to store the antenna when not in use
Our Van's roof rack is made with 80/20 aluminum so it seems pretty easy to design a mount for the antenna with that. Ordered the Starlink the Roof top angle mount from their website after seeing that several other Van videos used that mount.

I don't want to screw that directly to the roof of the van as the mount only has two massive diameter fastener holes which would overly stress the thin metal roof top. Building a mounting structure out of 80/20 is the plan.
Here I use a small scrap of plyboard to design a mount base plate template. The real base plate will be made from aluminum plate..
The base plate will be supported by a couple lengths of 80/20 bars which will span the distance between the last two rack supports.

I built this first out of wood and then used that prototype to set up the saw to cut the 80/20 to the exact required length. The right angle braces are what attach this contraption to the rest of the roof deck.


One neat feature of the angle roof mount is that it has two indentures, one on each end. I don't know what they were intended for but they are perfect for hiding the fasteners I used to secure the plate to the 80/20 bars. Without these little features the plate would need to be wider than the mount.

Here you can see the fastener and washer fit snugly while the mount sits flush on top of the 80/20 bar. It is rare when something like this just works out.
Next step is installing this thing on the roof of the van.

Next is the installation of the starlink 75 feet of cable through the van's roof. I like to use waterproof cable entry boxes from Amazon...

I have a huge set of water tight connectors of all sizes for these boxes and as expected nothing fits those freakishly big connectors on the Starlink 75 foot long cable. Normally I would cut the cable, push it through the box and then splice it back together. But I am not about to cut this cable. The solution was to utilize a rubber test tube stopper. The fix is to drill a hole through the center of the stopper...
This picture shows the top view, far left. bottom view middle and

Far right pic shows that I cut a slice thru to the hole in the center of the stopper. The cable will simply slip into the hole following the slit. Pushing the stopper into the watertight box will force the slit close making it water tight. Just to be sure the slit will be oriented downward. And finally a small slice across the length of the stopper was made where the stopper firmly fit into the boxes' opening. This final slice slips over the plastic on the side of the opening which firmly holds the stopper in place.
Here the cable is being fed through the van roof.
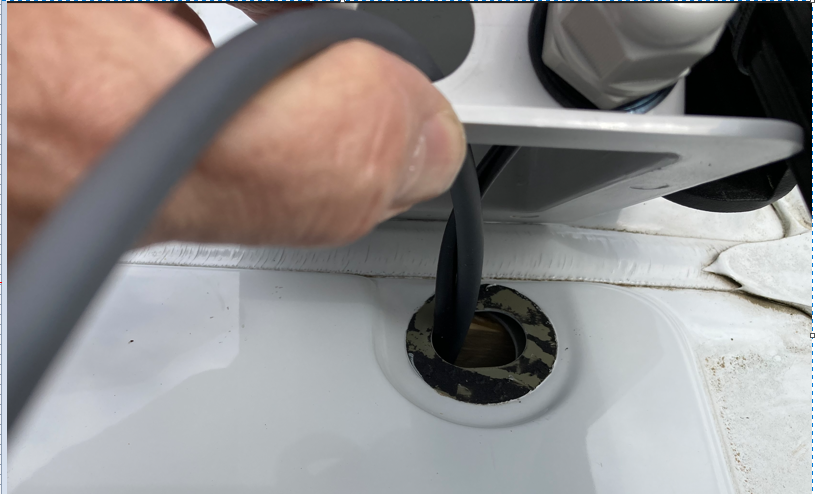
I added a second cable for my Ham radio that I have been meaning to install in the van for a long long time now...

Here the plan starts coming together.. the radio cable is installed as per the design of the box. The Starlink cable is installed using the rubber stopper hack.
It takes a bit of twisting, shoving and pulling to get the stopper seated properly. I am fairly certain that this will hold fast for years. But I'll definitely be checking it regularly just to be safe.

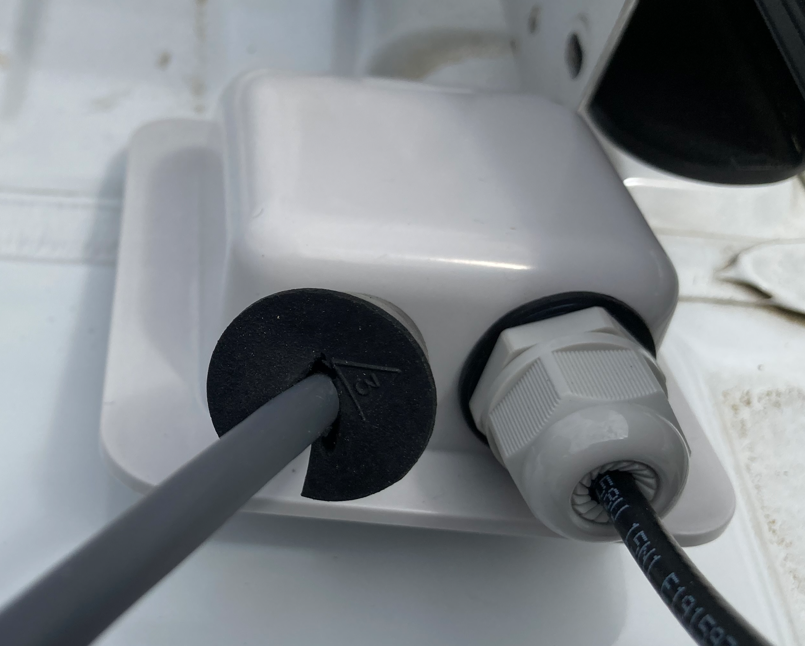
This is a good angle to show how the stopper design accepts the Starlink cable. I noticed that I had the stopper on the wrong side of the box and it was oriented wrong. Thankfully I caught this mistake before securely installing the box to the roof.

Now this is the correct orientation. As the stopper is pulled through the hole it compresses making a water tight seal. When the stopper is inserted far enough to reach the slice across the top of the stopper the side of the hole slips down into the stopper locking it into place.

Hard to see but it worked as planned. The length wise slice is pointing downward and the cross wise slice is on the top facing upward. Next installing the Butyl tape to make the box water tight
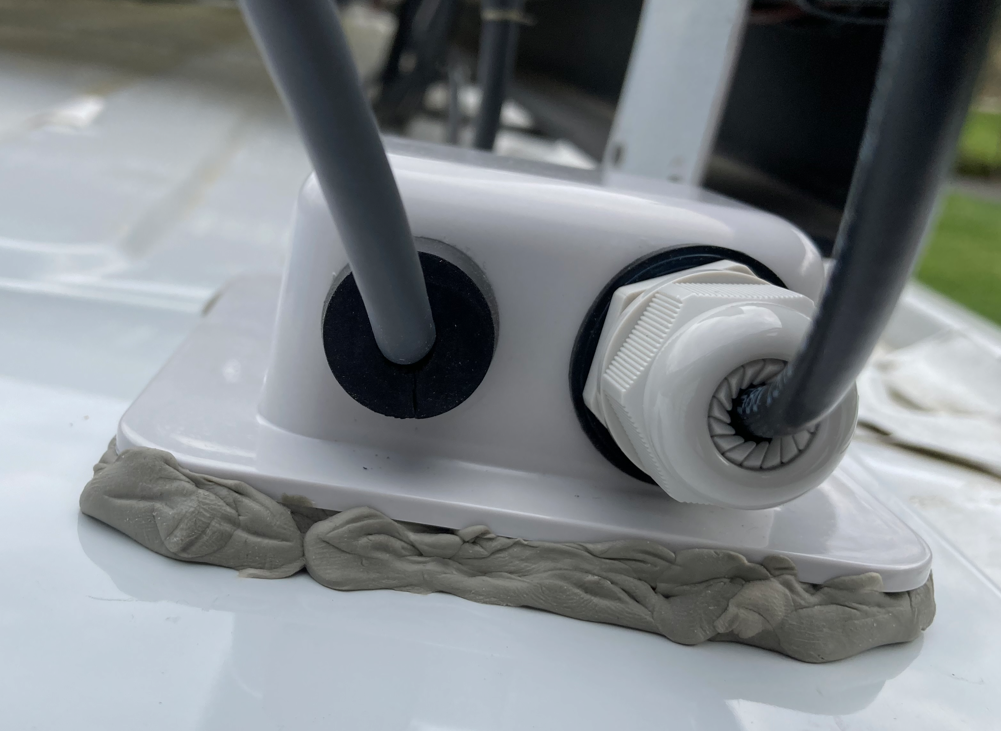
I like to run about 1/4 inch excess on all sides. After compressing the box to the roof the excess is pushed back against the box to seal any cracks or gaps.

Stainless steel screws secure the box to the roof and fully compress the butyl tape.

The goo acts like a liquid marshmallow. It slow flows from high to low leveling as it goes.


Now with all the cable on the roof we secured it to the bottom of the antenna mount. Normally we will utilize the roof top mount but on occasion when our camp site is blocked by some tree or structure we an unfurl the cable and use the ground mount to locate the antenna anywhere with in a quarter mile (actually 75 feet)


Finally the Starlink cable is run up the door from the router using plastic wire clips to hold it fast. The wire is fed into the camper via a large loop that will collapse as the door is closed preventing it from getting pinched in the door jam. The other end of the cable runs under the wall carpet into the roof access hole and on out to the antenna from there. This arrangement supports fully opening the door to swing all the way back to the side of the van.
Another project we can check off our list!


