Sunday, December 3, 2023

Toilet cabinet and other finishing touches

 Day 280: Making templates for the bathroom.  Butcher block to cut and shape, another complicated fan folding door and a bunch of weird angles to contend. 


Day 282: Installed the drop leaf countertop.  Note the bottom corner is cut at an angle cause like everything else in this build nothing square fits.  It looked like a perfect fit until we tried to close the sliding side door.


Flips up and bang more counter space.


    Day 285: Test fitting the mountain bike under the garage.


Installed the toilette, finally!  Fan fold doors completed and installed.  Well until I realized that the anchor screw holes are not supposed to be visible.  Dooh!  Now I have to take it down and reinstall.


Day 286: And the paper towel rack arrived.  We actually ordered 2 of them but one cam with missing pieces and a hole in the wrong place.  So, it went back.


Day 287: Collapsible broom arrives.  This will fit nicely underneath the counter top beside the toilette


Located the roof access hole which will support our 3 remaining cameras.


Camera cables from the outside on the roof.

Cameras are mounted to the roof rack. I had to fabricate a mount to extend the camera beyond the edge of the van since the roof rack is set back 4 inches from the edge.  

Camera from the other side of the mount.


Day 288:  There, its done. What do you think?  The camera cables seem a little messy now, but this is just testing the connections.  I had to cut and re-solder all the cables to fit through the watertight roof box.

After a bit of clean up ...  All the cables run through this little section of PVC pipe that is wrapped with carbon fiber vinyl tape.  The DVR unit is powered by the house batteries so I added a illuminated rocker switch to power it on and off.


Found a spot on the dash to mount the monitor.  Ran the monitor cable under the dash cover and up the side support.  Next project is to find the plug with the turn signal indicators and hook it up so the cameras automatically switch when the turn signal is selected. 


Testing the countertop cutout on the toilet cabinet.  Several rounds of trim and fitting later it went  in without a fight.


Putting the finish on the countertop as well as a couple other projects made from left over butcher block.


Day 291: installed the floating crown molding. There is enough space between the crown molding and the ceiling to put in some multi-color LED accent lighting


Accent lighting in action! Plus the towel rack(s) installed.


Added a grab handle to help with getting in/out of the van.  Ford parts wanted $75 for the little plastic handle, plus $140 for the trim cover, plus $120 for the mounting plate.  We bought this handle for $12 from Amazon and added a piece of scrap maple.  The most expensive thing was the stainless fasteners.


 Day 292:  Finished countertop installed over the toilet cabinet.  Now we are really ready to go!


Finally we are read to begin our first trip with a mostly completely finished almost build.


Saturday, December 2, 2023

Completed (almost)

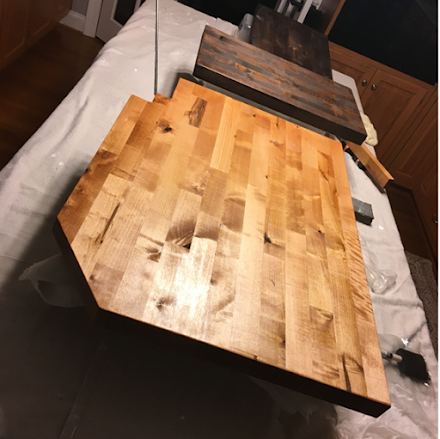
 Day 329: Dinning room / living room.  The Lagun table mount is a great addition to the build.  It adjust on 3 axis.  That table top is still the temporary version but we ran out of time before I could glue up the larger replacement.  Huge thank you to Nanny for helping with all the fabric work on the cushions and curtains!


In every RV we have owned had a floating trash can which roamed around the place while driving or sitting.  We extended the kitchen cabinet just enough to add this tilt out trash organizer.  The bottom of the unit is heavy enough to securely hold it close even during driving so no springs or latches required.


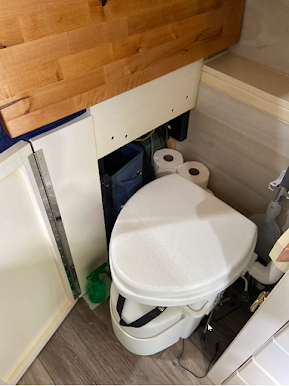
The toilet cabinet opens by flipping up the counter top and swinging open the fan fold doors.  Working out the latches here was a bit tricky.  We decided to mount the latch inside the cabinet which requires opening the top first before you can access the latch.  However that arrangement does hide the latch for a clean finish.


With the top down and doors closed toilet is hidden and the space is usable as a counter top again.  Curtains below the bed help hide the packed garage area.

The rear view and here the sliding shelf is extremely useful for storing all those necessary articles while making accessing them extremely easy.

Added a shelf to the back door along with some hooks.  The tops shelf is perfect height for a bed side night stand. The horizontal lines are quarter inch bungie cord.  I'm not thrilled with the look but can't complain about the utility.  I plan to dress this up a bit in the future.
 

A complete view from the rear.  Here we are packed and ready for the shake down cruise.  


A view from the bedroom looking forward.  You can tell my wife color coordinated everything.  I must admit it looks very homey.


The bedroom view from the kitchen.  In a tiny space keeping things in their place is a requirement.  We make the bed every morning.  Otherwise it adds to the cluttered look which makes the van seem much smaller.  Note the wall between the kitchen and the bedroom covered in stick on tile paper.  The design of this wall came together as we held a cardboard template over the desired location and just began drawing lines until we both agreed on the one we liked the best.  It pays to not overthink these things.


The bedroom cabinets fully packed and ready to travel.  We added a cargo net in the top of these cabinets since there was additional space.  Also Gina added a fake wall in the back with additional storage for clothes we hoped were not going to be necessary.  We have no plans for camping in cold weather but just in case the required coverings are back behind the fake wall.


The spice rack mounted over the sliding door comes in handy for more than just spices.  Even though it sticks out a bit from the door frame we have not bumped into it... yet.


First meal cooked on the road using the installed induction cooktop.  Funny the cooktop has a child lock mode which we some how accidentally activated during the build.  It took reading the manual and several attempts to figure out how to un-child lock it.


Everything and the kitchen sink!  Here we have the flip up counter top engaged.  The sink is deep and spacious enough to handle all we can through at it.  With the water heater mounted in the cabinet below the sink it is like having instant hot water.  Which is important since we have very limited water storage and a 17 liter grey water tank.  Thanks to the Recpro water pump we have ample water pressure.


Overall view of the kitchen.  The paper towel racks are visible above the cooktop and yes we have them both packed with necessary items.  With the battery power we have on board we can run the water heater, water pump, cooktop and microwave oven for at least a couple of meals before recharging. 


The microwave and fridge are firmly secured to their cabinet spaces.  The fridge sticks out of the cabinet just enough to allow the door to fully swing open.  Otherwise it would only open about 90 degrees.

Rounding out the kitchen is the cooler placement.  The cooler cabinet doubles as storage and seating.  The original plan was to have the seat flip up to reveal the cooler.  But that didn't workout so well as it involves moving the cushions and anything one them first.  Also the cooler lid requires additional space behind the cooler to fully open and the cabinet was just not wide enough.  Plan 'C' developed into a small plyboard sled for the cooler to sit on.  The sled has carpet glued to the underside to allow it to slide.  Two small hardwood ends hold the cooler firmly in place.


Found this little open/close valve on Amazon which connects to regular garden hose to drain water.  With this little addition plus a 2 meter garden hose we no longer have to remove the cooler from the van in order to drain the water

In one of those unplanned stroke of luck type of results the cooler fully extracted from its hiding place fits between the closed door and the cabinet.  Which allows access to cold items without the hassle of opening the door every time you need something.  The slide out feature also cleans the floor ever time you use it so that is an unexpected bonus!  But wait! There is more!  The cooler can serve as additional seating space beneath the flip up countertop.  This comes in handy for that meal on the run when you don't have time to swivel the passenger seat into position.


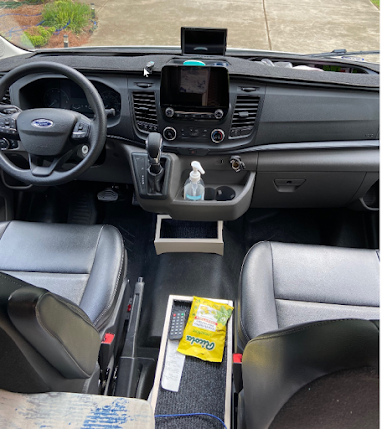
The view from the kitchen looking forward. The camera installation is barely visible now that all those cables are neatly hidden from view.  The shelf over the cockpit came with the van and we have packed it tight.  Note the curtains on either side of the cab.  These curtains easily slide along the track at the top to provide privacy when you need it.  The curtains also provide thermal protection to isolate the cab from the rest of the van. 


The window box packed with food stocks.  From the top row right to left we have candy bars, breakfast bars and snack bars.  Middle row from right to left there is coffee, granola, coffee, coffee, coffee fixings.  Bottom row left to right we have snacks, empty jars, raisins and cranberries.  Hmm, may need to add more coffee


The cockpit view.  Notice the little white boxes in the floor that Gina designed and built.  These little additions turned out to be extremely handy.  The one between the seats has a flip up lid to provide more storage inside.  She carefully designed the box to match the contour of the cab floor so the top of the box is level with the seats.  Way up on the dash is the camera system monitor.  I went with the smallest monitor trying to conserve space but am rethinking that decision.

And that's all for now!


Friday, December 1, 2023

Getting Decked Out

 Day 346: Finally we got our order placed for the decking material from Astroplastics in Covington Georga.  https://www.astroplastics.com/products/decking/ 

Technically they sell boat dock material.  Therefore, I am putting a boat dock on top of our van.

I picked up the materials with the Van, of course!  Saving a huge delivery charge.  Luckily the 12 foot boards and all fit nicely in the garage.


The decking materials can be cut just like an ordinary 2x6 on the miter saw.  The vented version we purchased are not so easy to rip.


Used CAD to help determine how much material and fasteners are required.  Since the boards are the exact same size as a 2x6 board and since I can't rip them I had to allow for some gaps in the design.  After several attempts this drawing won the best coverage with least material award.


The material plan calls for 3 sku's 

D1 = 65 inches long qty= 3 (center deck)

D2 = 84 inches long qty = 2 (Longer side decking)

D3 = 144 inches long qty 4 (longest outer decking)

Note: no silly unnecessary smart part numbers in my Bill of Materials!

D1's all cut to length and ready to install:


 To determine where the holes need to be drilled I started off using a square to mark the location of each 80x20 support.  80x20 extruded aluminum channel has a very narrow slot into which these carefully drilled holes must line up exactly.  Each hole gets a stainless steel screw inserted from the top and a flat T nut attached to the bottom.  The T-Nuts slide along in the slot in the 80/20.


 Although this method worked some what, I decided to build a jig to help better align the holes with those pesky slots.  The jig is made of a single 3/4 inch thick scrap board fixed to 2 x 2x4 segments that have all been ripped to the exact same width of the 80/20 channel.  Then the lines drawn on top of the board represent the slots on the 80/20.  Finally the holes near the center of the jig are used to align the drill with the decking channel slots.  

Here you can see the jig in action.  The process is a follows: use a square to mark the location of each 80/20 support on top of the van first, then bring the deck board into the shop where the jig is placed over the marks and drill though the jig holes.


This improved process with an actual Jig worked much better.  However, the difficulty increased with each sku.  The longer the Sku the more 80/20 supports and the more of those dang slots to line up.  The drill makes the jig, well jiggle, so I added clamps to help hold it in place.


The decking material has a channel for the screws with a top and a bottom.  The top engages the screw head which applies clamping force to hold the deck board to the 80/20 support.  The bottom of the channel provides a rest for the board to sit on the 80/20.  Therefore the bottom hole accuracy is not hyper critical.  Taking advantage of this fact I elongated the holes to give the boards a little wiggle room when sliding the board on the the 80/20 supports.

Here is an example of the T-nuts installed on the bottom of the deck board.  That little gap is all we have to work with while sliding the board onto the 80/20 rail.

The D1 and D2 deck boards I handled all by myself.  The D1 only required lining up 5 supports with double rows of T-Nuts.  No pictures of video of this process as adult language unfit for crusty old sailors accompanied fits of pushing, pulling, begging and pleading.  Thanks to a very large rubber hammer the smaller D1 and D2 installations went off pretty smooth.  Although I now need a new rubber hammer.
Here the first 3 D1 deck boards are installed and locked down.

  Used a 1/2 inch piece of maple plyboard as a spacer between each deck board.  This technique worked well but required the first board installed had to be exact.

The jig process continued to evolve to improve accuracy.  The final design included wings screwed vertically against the 2x4 segments on each end to help align the 80/20 and keep the whole arrangement square.  The new design called for a new process.  The new process was done on the roof of the van where I pushed the jig down tight over the deck board and the 80/20.  From there I drilled the holes into the deck.  Next the deck board was removed and brought back into the shop where additional drilling operations elongated the bottom holes.  Finally the screws and T-Nuts were installed.  After that more adult language, pushing, pulling, begging and pleading with a rubber hammer until the new board was snugly seated against the half inch maple ply board.

Progress continued thanks to help from Gina on the 12 foot boards.  Here is a view of the now famed rubber hammer taking a short break.

Gina performed many task as shown here putting down the fastener slot covers which hides the fasteners.

And here an extremely rare photo of me doing anything productive...


The deck is complete!  Sorry, the Boat Dock is complete!


This is the last big project on the Van!  We hope you have enjoyed this project.  
If you liked this project you don't have to click any buttons just be happy and stop following me!


The build

The Build Parts and Pieces External ·         Tires o    Road tires. §   Stock tires §   Continental Tires o    All terrain tires....